Monday, July 29, 2013 - 10:46 pm, by: Ben Lipman(Ben12a)
I removed the mould from the car- not too bad only grabbed in two areas, both places was a result of the gel coat bleeding through a join. There was a little bit of transfer of black paint onto the mould...not sure why that happens. Possibly because the paint was not fully, cured, or the gel coat is not going off fast enough.
All in all the mould will need a little work before use.
I decided the mould could use a little reinforcement. I had an idea I wanted to try out a while back: to use poly pipe as the basis for reinforcement. After putting the mould back on the car, I hot glued the pipe to the guard and then glassed over the lot. I'll see how it goes.
Wednesday, July 31, 2013 - 10:44 pm, by: Michael McKellar(Mickmini)
Ben Lipman wrote on Monday, July 29, 2013 - 10:46 pm:
I had an idea I wanted to try out a while back: to use poly pipe as the basis for reinforcement. After putting the mould back on the car, I hot glued the pipe to the guard and then glassed over the lot. I'll see how it goes.
good idea, better than no reinforcement at all.
Ben Lipman Goo Roo SA Soarer TT manual, plus TT track car, plus a spare shell
Wednesday, July 31, 2013 - 11:05 pm, by: Ben Lipman(Ben12a)
Update time: the mould above is still sitting neatly out of the way on the spare shell. I have been lent a set of wide body front guards (Thanks Lew!) to use as a basis for my new guards. The deal is I can't damage them- ie cut them up etc.
They were pretty banged up from sitting in a shed for ages, but trial fitment on the spare shell showed the bolt holes lined up nicely, so they had retained their shape. It took a couple of days to fill, sand, prime, fill, sand, prime, sand and paint the guards to get them up to standard for taking a mould.
From there it was the familiar story of half a dozen wax coats, forming flanges, spraying PVA, applying gel coat, and then doing the layup with standard polyester resin and 600g chopped strand matt.
Tomorrow should see the remainder of the mould completed, making each a three piece mould to get around the undercut at the rear, and the top inner section. The front area of the guard (behind the headlight) will be moulded separately and bonded later- I just cant see how to mould it as one piece. Looking at the glass part I was lent they appear to have done the same thing.
This will be an interim solution, as my plans are much more extreme. I need to put vents on top to create an air flow path for the oil coolers, and super enlarge the cute little vents behind the wheel that look good on ricers, but wont flow enough air for my needs. I might pull a part out of the moulds and then modify it and make new moulds, or I may just bond 'add ons' to the parts.
The plans to get to the track this weekend are shelved. It looks like rain Saturday and Sunday, and I will not have the car ready to my standards. I won't be buying another set of tyres this year, so I don't want to wast them on a half-arsed effort. I could be tempted to throw old tyres on it, but the car was hard enough to drive with 70 less KW when the tyres were a year younger. Plus, I have 40sq m of pavers that won't lay themselves.
Thursday, August 01, 2013 - 07:46 am, by: Andrew McKellar(Toymax)
Nice work on that front guard Ben. I'll be interested to see if the part comes out of it. Old Bruce took a look at my guards (which are the same as those) and identified it would need to be a 7-piece mold to get around all the shape and angles involved. If you get away with a total of 3 you are doing very well, and I'll buy the molds off you when you are done!
Thursday, August 01, 2013 - 01:18 pm, by: Ben Lipman(Ben12a)
Andrew McKellar wrote on Thursday, August 01, 2013 - 07:46 am:
I'll be interested to see if the part comes out of it
SO will I. I took a risk on the area around the wheel arch as there is not much draught there. I figured I should be able to pry the guard out. At any rate it will actually be a 4 piece mould, as I will do the little bit behind the headlight completely separate and bond it together. (Or have a look and see if it is absolutely necessary.
I don't think they are exactly the same as your guards- the venting is different isn't it?
Aaron, assuming the mould turns out OK, and I can get the resin infusion sorted, I would look at helping out a fellow enthusiast. No issue. I think there would be about 3m of carbon in each guard, plus half a kilo of resin, so it would probably cost me $200 in supplies to make each guard (not factoring in the cost of the mould seeing as I made them for me anyway). On top of that would be the bagging supplies but I couldn't guess how much all of that is until I figure it out for myself.
This morning I have been creating the second piece of each mould. First day of Sun in ages so I took full advantage and did the layup in the sun. Put myself under pressure as everything goes off a lot quicker, but I got both moulds done in 3 hours. There was a bit of repair work needed on one as I pushed too hard yesterday and broke one of the flange forms away, allowing gel coat to bleed through the flange form. A bit of work with a knife, dremel and wet and dry and it looked OK.
Just grabbing a bite to eat, before heading out to finish the third piece. Then clean up as it is the missus birthday, and she HATES the smell of fibreglass. It is the least I can do...
Ben Lipman Goo Roo SA Soarer TT manual, plus TT track car, plus a spare shell
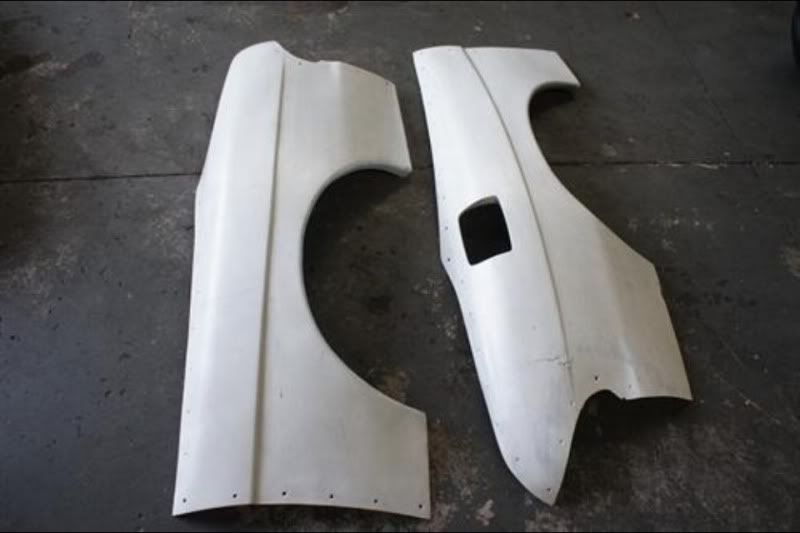
Friday, August 02, 2013 - 01:18 pm, by: Ben Lipman(Ben12a)
Trimmed and deplugged(?) the moulds today. I must say I am very happy with the result. I made a video of the plug coming out of the second mould, but my computer and YouTube are having a disagreement (IE shuts down every time I try to upload a video to YouTube). Until I figure that out, pics will have to suffice.
Friday, August 02, 2013 - 01:28 pm, by: Aaron Casey(Blownminiturbo)
Awesome man they look the goods. to be honest ive never been a fan of them guards but when they are actually coupled with the front bar and splitter they actually look really good. Flows better. how much wider are they over normal?
Friday, August 02, 2013 - 10:23 pm, by: Ben Lipman(Ben12a)
Got the video to upload...seems one of the add ons in IE are causing me grief.
I am stoked at how these turned out. This is the first time my moulds have not caused damage to the part (ie, ruined the paint etc). 80% of the mould would be what I would call class A surface. A polish should sort them out to a standard good enough to use on carbon parts.
Friday, August 02, 2013 - 10:35 pm, by: Aaron Casey(Blownminiturbo)
I didnt realise needed so much pressure to actually pop them out! I have 30mm rear over fenders i want to use but are pretty nasty so i dont know what to do with them.. i was thinking if i get a set of fronts off ya one day and fix up them rear ones would allow me to run some decent sized tyres..
Ben Lipman Goo Roo SA Soarer TT manual, plus TT track car, plus a spare shell
Saturday, August 03, 2013 - 08:10 am, by: Ben Lipman(Ben12a)
The first mould came apart easier than that, which is why I set up the video.
Essentially there is a vacuum between the two parts, so you have to overcome atmospheric pressure, as well as a slight chemical bond between the PVA, part and mould. The PVA is very flimsy, but it stops the gel coat bonding to the part in which case you would never get separated. More significantly, wherever gel coat has bled through joins, imperfections, or any 'undercuts' then a mechanical lock is formed and you need to break it. That is why it is important to get the plug finish as smooth as possible- otherwise every scratch will turn up in the mould, and allow the gel coat to 'key in' to the plug and lock the parts together.
The 50mm is a guess, but it would be close.
What s nasty about the rear over fenders? The style or condition? Post up a pic. Thinking about the work I did on these front guards, it might have been quicker to simply paint a flow coat over the lot and sand that down. That way you get a nice hard polishable surface in one step. Mind you, gel coat/flow coat is much harder to sand than bog and spray fillers.
Saturday, August 03, 2013 - 10:44 am, by: Aaron Casey(Blownminiturbo)
Ahh k so do you have to put the pva down every mould? I thought you just waxed the hell out of it then started making the piece? The rears I have are bit wavy and have some cracks I have to fix. Were supposed to be in great condition and wouldnt send any more closer pics so I just bought them on a whim hoping would be alright as dont come up often.. ill get some pics in a bit when I get back home
Ben Lipman Goo Roo SA Soarer TT manual, plus TT track car, plus a spare shell
Sunday, August 04, 2013 - 03:06 pm, by: Aaron Casey(Blownminiturbo)
Interested in making some wide guards to match your fronts hahaha :p when weather calms down a bit ill get them out and see if they are worth fixing.. this is them here
Ben Lipman Goo Roo SA Soarer TT manual, plus TT track car, plus a spare shell
Sunday, August 04, 2013 - 05:51 pm, by: Ben Lipman(Ben12a)
LOL Paul. So do I. Simpler time. Put fuel in car and tow it to the track. Check tyre pressure and drive.
Aaron, I have different plans for my rear guards. I will be boxing the lower rear and then integrating them into a bigger diffuser.
If you want to have a go at fixing them up for use, or for making a plug and mould I can offer you any advice you need- or I might be up that way around Christmas/New Years.
Monday, August 05, 2013 - 10:18 pm, by: Michael McKellar(Mickmini)
you could always mould a fitting plugged with plasticine into the back of the mould and pump water in to crack the mould. (never do this with compressed air - the water does not compress, so is much safer).Can then be used to get parts out of the mould.
I remember trying out some whizzbang wax that was supposed to be the best ever when i made a new front guard for my motorbike (advantage of working at the suppliers). Damned if i could crack that part out of the mould. Should have used the PVA like you did after all.
The finished moulds look great.
cheers michael
Ben Lipman Goo Roo SA Soarer TT manual, plus TT track car, plus a spare shell
Thursday, August 15, 2013 - 08:29 pm, by: Ben Lipman(Ben12a)
The car now has a new backside, LOL. No more dented rear quarter.
Paul and I set about making a carbon rear guard from my mould this week. The pics make it look better than it is- the surface had quite a few imperfections, but we expected that due to the lack of finishing work I did on the mould. I was always thinking of painting the guard to match the other side so this just confirmed it.
Today I gave it a coat of primer and then decided to cut the dented quarter out of the car (about 6.1kg came out). The new carbon panel weighs 1.6kg and is currently riveted to the top of the guard area awaiting final trimming and then bonding to the car before getting a coat of black.
Friday, August 16, 2013 - 10:10 pm, by: Ben Lipman(Ben12a)
No plans to do the other side. I actually bought the spare shell with the intent to cut the guard out and weld it into the race car. Plans changed somewhere between the purchase of the new wheels and the roll of carbon fibre. Over Christmas I was thinking of completely boxing the four corners of the car, but after many hours of contemplation in the shed I decided I like the fact the car looks like a Soarer, and decided to flare the guards instead.
Today I did all the final trimming and then bonded the guard to the car using 252 Sikaflex. Unfortunately my local Bunning's only had white 252, not black. A minor irritation. The guard is now primed, and will be sanded and painted tomorrow sometime (assuming the mercury gets into double figures at some stage).